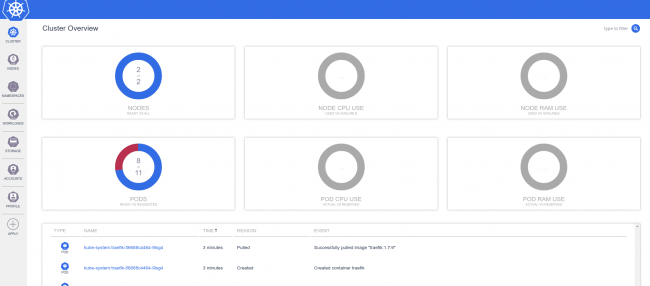
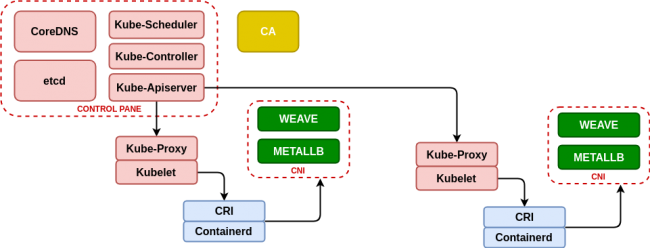
What is K3s? K3s (https://k3s.io/) is a Kubernetes solution created by Rancher Labs (https://rancher.com/) that promises easy installation, few requirements and minimal memory usage. For the approach of a Demo/Development environment this becomes a great improvement on what we have talked about previously at Kubernetes: Create a minimal environment for demos , where we can see that the creation of the Kubernetes environment is complex and requires too many resources even if Ansible is the one who performs the difficult work. We will see if what is presented to us is true and if we can include the Metallb tools that will allow us to emulate the power of the Cloud providers balancers and K8dash environments that will allow us to track the infrastructure status. K3s Download We configure the virtual machines in the same way as for Kubernetes, with the installation of dependencies: We download the latest version of k3s from https://github.com/rancher/k3s/releases/latest/download/k3s and put it in /usr/bin with execution permissions. We must do it in all the nodes. What is K3s? K3s includes three “extra” services that will change the initial approach we use for Kubernetes, the first is Flannel, integrated into K3s will make the entire layer of internal network management of Kubernetes, although it is not as complete in features as Weave (for example multicast support) it complies with being compatible with Metallb. A very complete comparison of Kubernetes network providers can be seen at https://rancher.com/blog/2019/2019-03-21-comparing-kubernetes-cni-providers-flannel-calico-canal-and-weave/ . The second service is Traefik that performs input functions from outside the Kubernetes cluster, it is a powerful reverse proxy/balancer with multiple features that will perform at the Network Layer 7, running behind Metallb that will perform the functions of network layer 3 as balancer. The last “extra” service of K3s is servicelb, which allows us to have an application load balancer, the problem with this service is that it works in layer 3 and this is the same layer where metallb work, so we cannot install it. K3s Master Install On the first node (which will be the master) to be installed, we execute /usr/bin/k3s server –no-deploy servicelb –bind-address IP_MACHINE, if we want the execution to be carried out every time the machine starts we need to create a service file /etc/systemd/system/k3smaster.service And then, we execute To launch K3s and install the master node, at the end of the installation (about 20 seconds), we will save the contents of […]
Tag: containers
Kubernetes: Create a minimal environment for demos
Every day more business environments are making a migration to Cloud or Kubernetes/Openshift and it is necessary to meet these requirements for demonstrations. Kubernetes is not a friendly environment to carry it in a notebook with medium capacity (8GB to 16GB of RAM) and less with a demo that requires certain resources. Deploy Kubernetes on kubeadm, containerd, metallb and weave This case is based on the Kubeadm-based deployment (https://kubernetes.io/docs/setup/production-environment/tools/kubeadm/create-cluster-kubeadm/) for Kubernetes deployment, using containerd (https://containerd.io/) as the container life cycle manager and to obtain a minimum network management we will use metallb (https://metallb.universe.tf/) that will allow us to emulate the power of the cloud providers balancers (as AWS Elastic Load Balancer) and Weave (https://www.weave.works/blog/weave-net-kubernetes-integration/) that allows us to manage container networks and integrate seamlessly with metallb. Finally, taking advantage of the infrastructure, we deploy the real-time resource manager K8dash (https://github.com/herbrandson/k8dash) that will allow us to track the status of the infrastructure and the applications that we deploy in it. Although the Ansible roles that we have used before (see https://github.com/aescanero/disasterproject) allow us to deploy the environment with ease and cleanliness, we will examine it to understand how the changes we will use in subsequent chapters (using k3s) have an important impact on the availability and performance of the deployed demo/development environment. First step: Install Containerd The first step in the installation is the dependencies that Kubernetes has and a very good reference about them is the documentation that Kelsey Hightower makes available to those who need to know Kubernetes thoroughly (https://github.com/kelseyhightower/kubernetes-the-hard-way), especially of all those who are interested in Kubernetes certifications such as CKA (https://www.cncf.io/certification/cka/). We start with a series of network packages We install the container life manager (a Containerd version that includes CRI and CNI) and take advantage of the packages that come with the Kubernetes network interfaces (CNI or Container Network Interface) The package includes the service for systemd so it is enough to start the service: Second Step: kubeadm and kubelet Now we download the executables of kubernetes, in the case of the first machine to configure it will be the “master” and we have to download the kubeadm binaries (the installer of kubernetes), kubelet (the agent that will connect with containerd on each machine. To know which one is the stable version of kubernetes we need to execute: And we download the binaries (in the master all and in the nodes only kubelet is necessary) […]
Choose between Docker or Podman for test and development environments
When we must choose between Docker or Podman? A lot of times we find that there are very few resources and we need an environment to perform a complete product demonstration at customer. In those cases we’ll need to simulate an environment in the simplest way possible and with minimal resources. For this we’ll adopt containers, but which is the best solution for those small environments? Docker Docker is the standard container environment, it is the most widespread and put together a set of powerful tools such as a client on the command line, an API server, a container lifecycle manager (containerd), and a container launcher (runc). Install docker is easy, since docker supplies a script that execute the process of prepare and configure the necessary requirements and repositories and finally installs and configures docker leaving the service ready to use. Podman Podman is a container environment that does not use a service and therefore does not have an API server, requests are made only from the command line, which has advantages and disadvantages that we will explain at the article. Install podman is easy in a Centos environment (yum install -y podman for Centos 7 and yum install -y container-tools for Centos 8) but you need some work in a Debian environment: Deploy with Ansible In our case we have used the Ansible roles developed at https://github.com/aescanero/disasterproject, to deploy two virtual machines, one with podman and the other with docker. In the case of using a Debian based distribution we must to install Ansible: We proceed to download the environment and configure Ansible: Edit the inventory.yml file which must have the following format: There are some global variables that hang from “vars:”, which are: The format of each machine is defined by the following attributes: We deploy the environment with: How to access As a result, we obtain two virtual machines that we can access via ssh with ssh -i files/insecure_private_key vagrant@VIRTUAL_MACHINE_IP, in each of them we proceed to launch a container, docker run -td nginx and podman run -dt nginx. Once the nginx containers are deployed, we analyze what services are executed in each case. Results of the comparison Podman, start only a process to launch nginx: About the size of the virtual machines there is only 100 MB of difference between the two: In conclusion we have the following points: Docker Podman Life cycle management, for example […]

